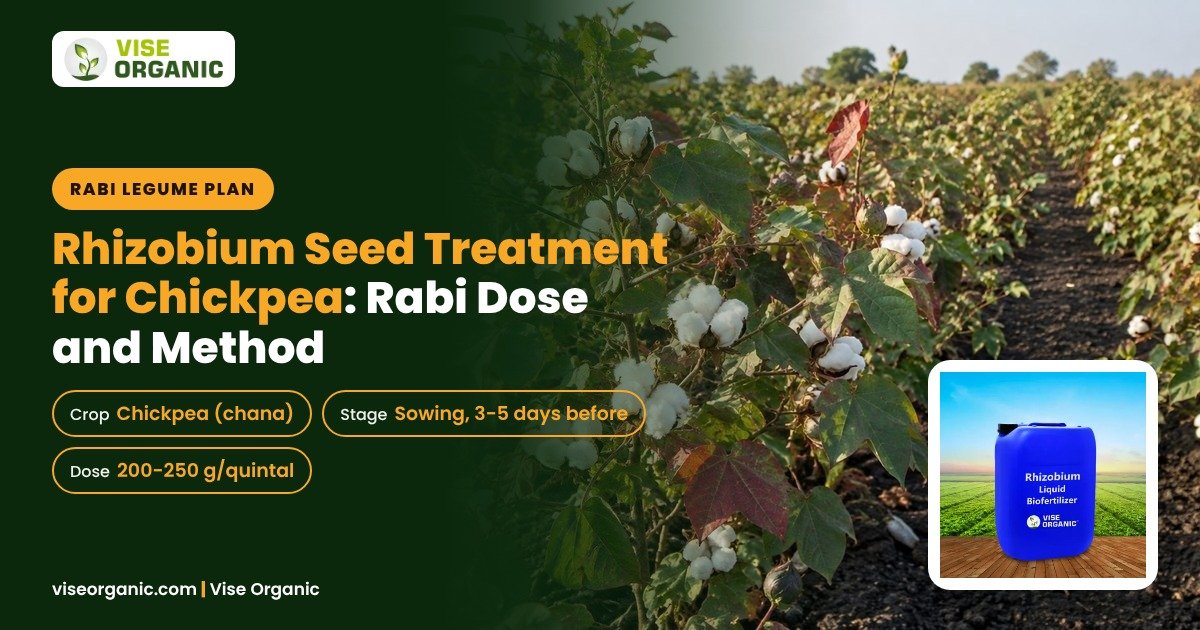
Walk into a chickpea field in the second week of December and two plots tell you everything. One stands pale with thin stems and yellowing lower leaves. The other is bushy, deep green, with three or four branches on each plant. The seed, the variety and the fertiliser bill were the same in both. The difference was made five days before sowing, in a steel plate, with a packet of culture and a mug of water.
This guide covers Rhizobium seed treatment for chickpea in the rabi crop: what the bacteria actually do inside the root, the dose per quintal of seed, the slurry method step by step, what to do when the field is sandy or newly irrigated, and where peat-based packets beat liquid bottles. If you grow chickpea (chana, kabuli or desi) in Gujarat, Rajasthan, Madhya Pradesh, Maharashtra or UP, this is the cheapest in-season decision you will make this October or November.
What Rhizobium Does Inside a Chickpea Root
Chickpea cannot make nitrogen from the air on its own. It hires help. Within 8 to 12 days of germination, rhizobium bacteria that have reached the root hair surface trigger the plant to form small swellings, the nodules, and each nodule carries leghaemoglobin, the red pigment that lets the bacteria fix atmospheric nitrogen in a low-oxygen pocket.
The plant pays for this with sugars from photosynthesis. In return, the nodule feeds the crop nitrogen in a form the roots can take up directly. A well-nodulated chickpea crop meets most of its nitrogen need this way, which is why a field with good nodules holds its colour through February while a poorly nodulated one fades.
The catch is that the bacteria must be present near the seed, in the right number, and alive. Native soil populations are often weak, out-competed by other microbes, or belong to a strain that nodulates fenugreek and greengram but not chickpea. Seed treatment puts a fresh, crop-specific population exactly where the first root hairs will emerge. That is the whole logic of this practice.
Why Chickpea Needs a Crop-Specific Strain
Rhizobium is not one organism. Different strains pair with different legumes. A culture sold for berseem or lentil may nodulate poorly on chickpea, and a packet that nodulates well in one district may underperform in another soil.
Ask the supplier which host the strain was raised on. For chickpea you want a Mesorhizobium (earlier grouped under Bradyrhizobium) culture multiplied for chana. Our Rhizobium liquid biofertilizer is sold for legume crops, and the Rhizobium multiplier is the lab culture used to grow that population further when a grower or FPO wants to bulk up their own carrier material under supervision.
Two other inputs often sit alongside rhizobium in a chickpea plan, and they do different jobs. Our PSB biofertilizer works on locked phosphorus in the soil, which matters on the calcareous black soils of Saurashtra where chickpea root growth is often limited by phosphorus availability rather than nitrogen. And Soil Carbone addresses soil organic carbon, the food and shelter that keeps any inoculant population alive past the first month.
When to Apply: The Sowing Window
Timing decides more of the outcome than the dose does. The bacteria ride on the seed, so they must be applied to seed that will go into the ground within a few days. Treated seed stored for a month loses a large share of its live cells, especially in a warm shed.
In most chickpea belts the sowing window runs from mid-October to mid-November, with a target of 15 to 25 cm of stored moisture in the top 30 cm of soil. Treat the seed 3 to 5 days before you sow, never earlier, and never in the hot afternoon. If your seed has already received a chemical fungicide or insecticide, the order of operations matters and is covered below.
Late-sown chickpea, after 25 November, nodulates less because the crop runs out of cool days before the nodules reach full activity. In that situation, inoculation still helps but expect a weaker response, and support the crop with a foliar feed at branching. Growers who want a ready option for that stage often use Nutri Plus, which is blended for pulses.
Dose Per Quintal of Seed
The standard carrier-based rate is 200 to 250 g of culture per quintal (100 kg) of chickpea seed, which works out to 2 to 2.5 g per kg of seed. Liquid formulations are typically used at 60 to 100 ml per quintal. Always confirm the number printed on your packet, because counts per gram differ between manufacturers and change with shelf life.
| Input | Rate | Per 10 kg of seed | Note |
|---|---|---|---|
| Peat-based rhizobium culture | 200-250 g/quintal | 20-25 g | Standard carrier method |
| Liquid rhizobium | 60-100 ml/quintal | 6-10 ml | Add 200 ml clean water |
| Jaggery or sugar for slurry | 20-30 g/quintal | 2-3 g | Only if no sticker is supplied |
| Gypsum dust for dusting | 100-200 g/quintal | 10-20 g | Anti-caking, improves flow |
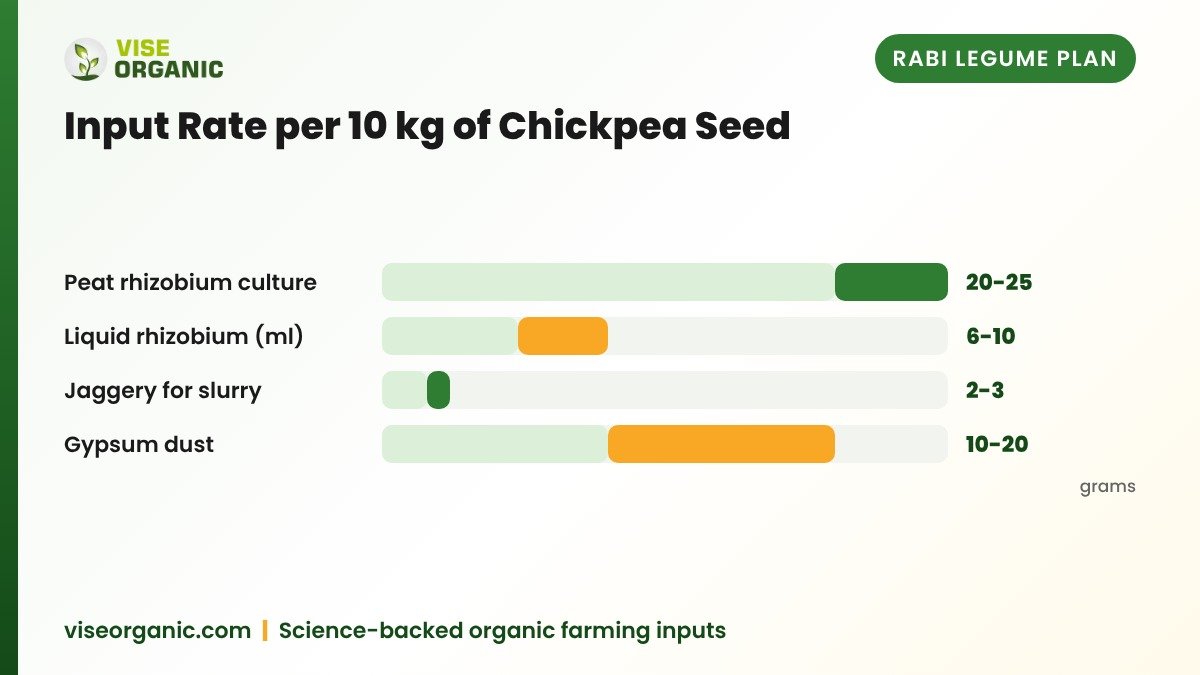
A 10 kg packet of seed therefore needs roughly 20 to 25 g of peat culture, about one heaped matchbox-full. Do not increase the dose hoping for more nodules. Excess carrier material on the seed can affect flow through the seed drill and adds nothing to the population.
Chart block note: the numbers in the table above are the working rates for a 10 kg seed lot.
The Slurry Method, Step by Step
Do this on a shaded veranda or under a tree, not in open sun. You need a wide steel plate or a cement floor, a mug of water, and clean hands or a plastic glove.
- Wash the seed. Remove dust, chaff and shrivelled grains by winnowing and a quick rinse in water. Discard floaters. Damp seed takes culture far better than dry, dusty seed.
- Make the slurry. Mix the full dose of culture into 250 to 300 ml of water per kg of seed in a steel bucket. Break all lumps with your fingers until the mix is smooth, like thin buttermilk.
- Add a sticker. Stir in 2 to 3 g of jaggery solution per kg of seed if the packet does not carry one. Too much jaggery feeds mould and other microbes, so keep it low.
- Coat the seed. Tip the seed into the slurry in small lots and turn with a gloved hand or a wooden plank until every seed carries a dull grey-brown film. Do not rush this; dry patches are untreated seed.
- Dry in shade. Spread the seed on a clean gunny sheet or cement floor in shade for 2 to 4 hours. Never dry treated seed in sunlight. A light dusting of powdered gypsum at the end keeps seeds free-flowing in the drill.
- Sow within 5 days. Keep the treated seed in a cotton or jute bag in a cool dark room. Sow at the normal depth of 4 to 5 cm into moisture.
If you are treating only a few kilograms for a kitchen plot, the same steps work in a steel plate with half a mug of water. The scale changes, the sequence does not.
Seed Treatment or Soil Application
Seed treatment places the bacteria with the seed, which is efficient and cheap. Soil application through the seed line or with irrigation covers a bigger root volume but needs far more carrier material and a soil that already supports the strain.
| Method | Material per acre | Cost effort | Best when |
|---|---|---|---|
| Seed treatment | 400-500 g culture | Low | Normal seed bed, 20-25 kg seed rate |
| Soil with FYM | 2-4 kg culture in 200-300 kg FYM | Medium | Sandy or eroded land, low organic carbon |
| Banded near seed line | 1-2 kg culture | Medium | Drill with a separate fertilizer box |
| Liquid through drip | 1-2 L per acre | High | Fertigation set available, summer zaid legume |
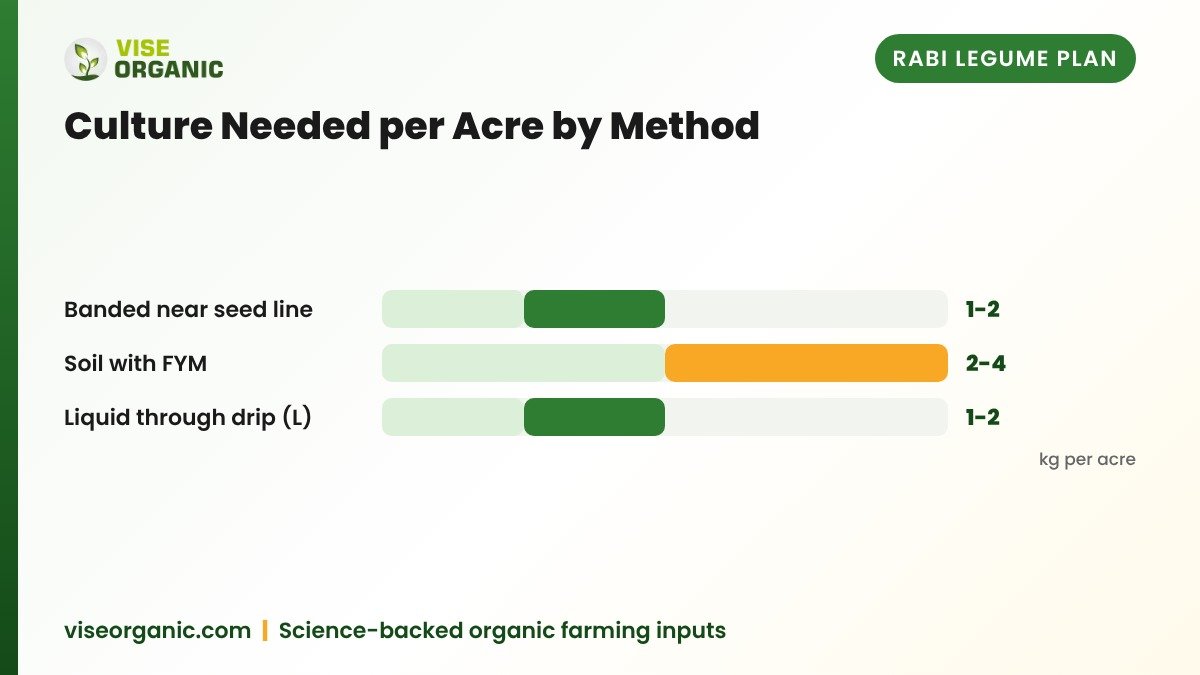
For most chickpea growers, seed treatment alone is the right call. Move to soil application only when the land is sandy, recently levelled, or has very low organic carbon, where an inoculant applied only on the seed struggles to spread. A field with low organic carbon is a different problem from a field with no rhizobium, and adding Eco Granule humic granules at 4 to 8 kg per acre with the basal dose works on the soil side, not the microbe side. Seaweed products such as Seacure Liquid sit in the same plan as a mild root and stress support at branching and flowering, not as a substitute for inoculation.
What to Do When Nodules Are Weak
Dig a plant with soil around the roots, wash the root ball gently in a bucket, and cut 8 to 10 plants at the soil line. Split the crown and look at the nodules.
- Cut a nodule and read the colour. A creamy white or translucent interior means the nodule is not fixing. A pink or red centre means it is working.
- Count nodules per plant. Fewer than 10 to 15 active nodules per plant at flowering points to an inoculation or soil problem, not a variety problem.
- Check the seed bed. Seed sown deeper than 6 cm, or into dry soil that later cracked, gives poor nodulation even with fresh culture.
- Review the chemical seed treatment. Some fungicides are hard on rhizobium. If you must use one, apply the chemical first, let the seed dry fully, then apply the culture, and keep the gap of at least 24 hours.
- Check nitrogen in the soil. A heavy basal nitrogen dose suppresses nodulation because the plant takes the free nitrogen instead. On legumes, keep nitrogen to a small starter only.
If nodulation failed across the field, the practical recovery is a foliar support at branching and again at pre-flowering, plus a proper soil-side plan for next season. Read the Biofertilizer seed treatment guide for rabi crops for how inoculation fits with the rest of the rabi inputs, and How to use PSB bacteria in organic farming for the phosphorus half of the same problem.
Matching Inoculants to Your Soil Type
Chickpea grows on everything from sandy loam in Rajasthan to heavy black cotton soil in Saurashtra. The soil decides which input is the limiting one.
| Soil condition | Likely limit | What to change |
|---|---|---|
| Calcareous, pH above 8 | Locked phosphorus and zinc | Seed treatment plus PSB, zinc sulfate at label rate |
| Sandy, low organic carbon | Bacteria die before spreading | Seed treatment plus FYM-borne soil application |
| Heavy black cotton, slow drain | Weak early root growth | Improve drainage, treat seed, sow shallow |
| Saline patches | Poor germination and nodulation | Gypsum as advised by soil test, avoid jaggery slurry |
| Continuous chickpea for years | Strain fatigue, disease load | Rotate with a non-legume, refresh culture each season |
On saline patches, skip the jaggery slurry and use a plain water slurry with a sticker, since sugar solutions can worsen the osmotic stress on already stressed seed. For the soil-life angle on heavy soils, see What advantages does potash mobilizing microorganism offer as an organic fertilizer, which covers the potassium side of the same calcareous soils.
Safety and Label
Read the full label before you open the packet, and match the crop named on it to the crop in your bag. Check the manufacture and expiry dates; peat cultures lose count fast after expiry, and a swollen or leaking packet is a packet to return.
Wear gloves and a simple mask while mixing slurry, and wash your hands before eating. Do not mix microbial culture with chemical fungicides, bactericides or systemic insecticides in the same tank or the same slurry bucket unless the label explicitly allows it. Store packets away from direct sun and heat, ideally below 35 degrees Celsius, and never in a store room next to the pesticide shelf. Keep all material away from children and away from wells, ponds and canals. Treated seed is not food; burn or bury any leftover treated seed and never feed it to cattle.
What to Check Before Buying in Bulk
Dealers and FPOs buying culture for a whole village should verify a few things before a single packet is paid for.
- Ask for the batch certificate. Live count at the time of dispatch, carrier type, host crop and batch number, in writing on company letterhead.
- Check the pack dates. Buy the newest batch you can get, and never stock peat culture through a hot summer in a tin shed.
- Test before you distribute. Germinate a small seed lot with the culture in a glass jar for 10 days and count nodules before recommending it to a hundred farmers.
- Confirm shelf life and storage terms. Ask what the count is at the end of the stated shelf life, and whether the company can hold cold storage for your order.
- Inspect the packing. Sealed foil or laminated pouches with a printed batch number, no pinholes, no caked lumps when you squeeze a corner.
For bulk, dealership or FPO orders, write to support@viseorganic.com or call +91 84014 31440, and see the NPOP organic compliance page for how our microbial formulations are positioned for certified organic programmes. What is allowed on a certified farm is decided by NPOP or your certifier's rules, so confirm with them before you switch inputs.
Frequently Asked Questions
What is the rhizobium dose for chickpea seed treatment?
For peat-based culture, 200 to 250 g per quintal of seed, which is 2 to 2.5 g per kg. Liquid formulations are generally used at 60 to 100 ml per quintal. Confirm the exact figure on your packet, since counts per gram vary between manufacturers.
Can I mix rhizobium with a fungicide seed treatment?
Apply them separately, not together in one slurry. Apply the chemical treatment first, dry the seed fully, then apply the culture after at least 24 hours. Some fungicides are hard on rhizobium cells, so check the label or ask your KVK which products are compatible.
How many days before sowing should I treat chickpea seed?
Three to five days. The bacteria ride on the seed and lose viability in storage, so treated seed kept for weeks in a warm shed gives weak nodulation. Dry only in shade and store in a cotton or jute bag in the dark.
How do I know if nodulation actually worked?
At flowering, pull 8 to 10 plants with the root ball, wash gently and split the crowns. Active nodules are about 3 to 5 mm and pink or red inside when cut. White or green interiors mean the nodules are not fixing nitrogen.
Is seed treatment enough or should I also apply it to the soil?
On normal seed beds with a 20 to 25 kg seed rate, seed treatment is usually enough. Add soil application mixed into 200 to 300 kg of FYM when the land is sandy, recently levelled or very low in organic carbon, where a seed-borne population cannot spread.
Does rhizobium replace urea in chickpea?
It reduces the need for a top dressing rather than replacing all nitrogen. A small starter dose of nitrogen at sowing is common practice, and heavy nitrogen suppresses nodulation. Fix your dose from a soil test and local recommendations.
Which crops should I rotate chickpea with to keep the bacteria useful?
Rotate with a non-legume such as wheat, mustard, cumin or a cereal-fodder crop for a season or two. Continuous legumes build up disease and reduce the benefit of inoculation, so refresh the culture every season rather than reusing leftover packets.
Conclusion
Rhizobium seed treatment for chickpea is a five-day-before-sowing job that decides how green your crop looks in February. Use a crop-specific culture at 200 to 250 g per quintal, coat the seed in shade, sow within five days into moisture, and dig a few roots at flowering to check the pink centres. Do that alongside a phosphorus plan and honest attention to soil organic carbon, and the rabi legume does a large part of the feeding itself.
If you want the right strain for your soil, a bulk pack for your FPO, or a second opinion on your chickpea plan, browse Our products or Contact Vise Organic. For crop-specific advice you can also Request a callback and our agronomy team will call you.
Disclaimer: This article is general agronomic information. Results vary with soil, crop, weather and practices. Always read and follow the product label and consult a local agronomist for advice specific to your field.
Article Topics & Tags:
Vise Agronomy Team
The in-house agronomy and field research team at Vise Organic Biotechnology, publishing applied research on bio-fertilizer protocols, crop protection, and sustainable cultivation practices.